You can grow pumpkins in different versions of Minecraft easily. All you need to know is the steps to find seeds, water, bone meal, and the tools to use.
The process can be engaging and fulfilling, and easy to do. In this article, you’ll learn what you need to know about farming pumpkins in Minecraft to start right away.
What do you need to grow pumpkins in Minecraft?
The following materials are very important in your quest to farm pumpkins:
- The pumpkin seeds
- Water
- Hoe (any type)
- The land to grow the seeds
- Bone meal (optional)
- Fence
- Fence gate
Step 1: Find the materials
Here’s an in-depth look at how to get the materials needed to grow pumpkins in Minecraft.
1. Pumpkin seeds

The first thing to do is figure out how do you get pumpkin seeds in Minecraft? There are different ways to accomplish this.
First, check the chest loot from dungeons, villages, mineshafts, and woodland mansions. Your chance of finding pumpkin seeds in these places varies significantly—with the villages having the higher percentage.
Next, you can look for pumpkins that generate naturally in the overworld in grassy biomes, woodland mansions, villages, and dungeons. When you’ll have to use a crafting menu to produce pumpkin seeds.
One fully grown pumpkin will give you four pumpkin seeds that you should put in the inventory and move to the other items.
Lastly, you can get pumpkin seeds from wandering traders when you give them 1 emerald.
READ: How do you make a rope to leash an animal in Minecraft?
2. Hoe (any type)

Below are recipes for crafting different types of hoes. Use the one you prefer.
- Stone-tier hoe: Combine any stone-tier block and a stick on the crafting menu.
- Gold hoe: Combine gold ingots and a stick on the crafting menu.
- Iron hoe: Combine iron ingots and a stick on the crafting menu.
- Diamond hoe: Combine diamond and a stick on the crafting menu.
- Wooden hoe: Combine any plank and a stick on the crafting menu.
You also can trade 1 emerald for 1 stone hoe with novice-level toolsmith villagers or 4 emeralds for 1 diamond hoe with a journeyman-level toolsmith.
3. The farmland
Look for an ideal piece of farmland to grow the pumpkin seeds. The two options available are:
- Naturally-generated farmlands in villages are surrounded by logs, cobblestone, or sandstone.
- Creating one using a hoe on a grass block, dirt block, or dirt path.
4. Water

Farmland needs water to prevent it from reverting to dirt. You could go for either still or flowing water.
It doesn’t matter, provided it’s in the middle where it hydrates the farmland blocks evenly.
5. Bone meal

This acts as fertilizer for your pumpkin. You can craft it by putting a bone or bone block on the crafting menu.
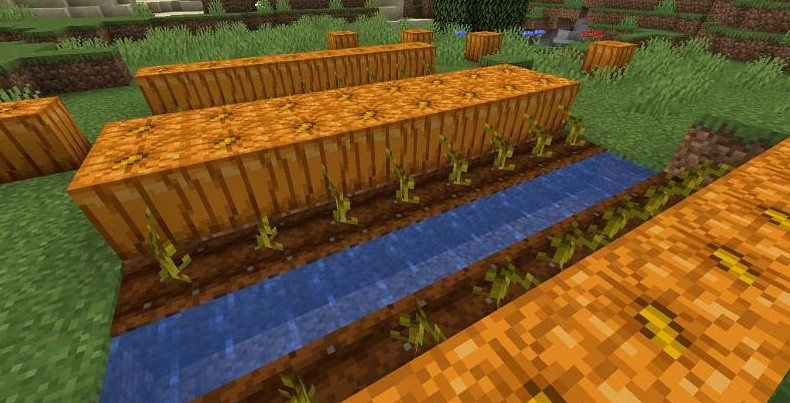
Step 2: Till the farmland
Now that all the necessary items are available, you can start tilling the farmland using a hoe. To do that, right-click on the screen while holding the hoe.
Step 3: Put a water source block
Get a water source block and place it in the middle or next to your tilled farmland (at least 4 blocks away).
This will hydrate the land and create an ideal environment for the pumpkin to flourish.
Step 4: Plant your pumpkin seeds
Select your seeds, then right-click on the farmland block to start planting. While at it, make sure you leave a block space of dirt, grass, coarse, farmland, or dirt path for the pumpkin to grow.
This is because pumpkins don’t grow on the same block as the seeds. If you fail to do this, then no pumpkin will grow.
If you want rows of pumpkins, leave at least one adjacent block of space. But, if you don’t need a lot of pumpkins and want them to grow fast, leave 4 open adjacent blocks of space.
Step 5: Use bone meal
So, how long does it take for a pumpkin stem to grow in Minecraft? You’ll have to wait 10-30 minutes for the stem to mature through its 3 growth phases and start producing pumpkins.
But you can speed up the process by using a bone meal. Simply select the bone meal and right-click the pumpkin seed or stem.
Step 6: Set up the lights
Do pumpkins need light to grow in Minecraft? Yes, they do. A light level of 9 and above is necessary for the pumpkins to produce.
You should set up torches near the farmland or glow stones right above the stems.
Don’t break the matured stems
Step 6: Fencing
You can fence off the area to prevent monsters from getting in.
Step 7: Wait
After finishing the steps above, you’ll wait for the pumpkins to grow from the stems.
Step 8: Harvest
How long does it take for pumpkins to grow in Minecraft and be ready for harvesting? Once the stem matures, the pumpkin only takes a few minutes to produce. You’ll harvest by breaking them.
You must be careful not to break the stem and fast to produce more pumpkins (after every 1 or 2 minutes).
What can you do with pumpkins after harvesting?
- Trade with locals
- Produce snow golems/iron golems.
- Wear the pumpkins on your head as a helmet.
- Prepare pumpkin pie: Combine a pumpkin, sugar, and an egg on the crafting menu. The pie restores 4 hunger points.
- Make jack o’ lanterns: Combine a varved pumpkin and a torch on the crafting menu.
FAQs
These are the most commonly asked questions about pumpkins in Minecraft.
Why won’t pumpkins grow in Minecraft?
If you’ve waited a long time and don’t see pumpkins growing on the farmland, you need to check on the following factors.
- There must be a free block space next to the stem.
- The free block space next to the stem must comprise farmland, grass, coarse dirt, or a dirt path.
- The minimum light level should be 9.
- There should be adequate water source block(s) 4 blocks away.
- Make sure the stem is not damaged.
Do pumpkins need water in Minecraft?
Yes, they do. Water helps to hydrate the farmland and prevent it from turning back into normal dirt that would break the pumpkins planted.
That brings us to the end of how to grow pumpkins in Minecraft bedrock and java. You should go ahead and put your knowledge to the test.
Be sure to check back for more Minecraft gaming tips and ask anything you’re not sure of in the comment section.